Building a Full Stack Dapp
In the following tutorial we will go through a step-by-step guide on how to create a full-stack Hello World App that interacts with Gnosis. This tutorial is designed for either new developers interested in Dapp development or existing devs interested in migrating to Gnosis development.
Throughout the tutorial, feel free to reference other pages in our documentation for information with greater depth - however this tutorial will give you a basic understanding of how to get up and running.
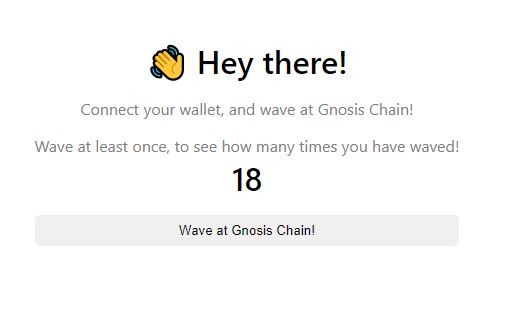
This Dapp will allow you to wave at Gnosis, and see how many times you have waved.
Guideline Overview
- Creating and connecting your wallet to Gnosis
- Setting up your project
- Smart-contract development
- Using Hardhat for contract development
- Deploying your contract on Gnosis
- Integrating your smart contract with your project's front end
Wallet
- Select one of the wallets to store Gnosis gas token (xDai).
- Fund your wallet with xDai using one of the faucets.
- To interact with dApps, we recommend to setup and configure MetaMask.
Setting up your project
Tech Stack:
- Waffle, a library for writing and testing smart contracts.
- Hardhat, a development environment used for smart contract compiling, deploying, testing and debugging.
- Ethers.js, a library for interacting with Ethereum Virtual Machine (EVM) chains.
First let's initialize your project:
mkdir gnosis-full-stack-dapp
cd gnosis-full-stack-dapp
npm init -y
npm install --save-dev hardhat@2.9.9
Now let's run Hardhat to create a project:
npx hardhat
This is what you should see:
888    888                      888 888               888
888    888                      888 888               888
888    888                      888 888               888
8888888888  8888b.  888d888 .d88888 88888b.   8888b.  888888
888    888     "88b 888P"  d88" 888 888 "88b     "88b 888
888    888 .d888888 888    888  888 888  888 .d888888 888
888    888 888  888 888    Y88b 888 888  888 888  888 Y88b.
888    888 "Y888888 888     "Y88888 888  888 "Y888888  "Y888

Welcome to Hardhat v2.9.9

? What do you want to do? …
▸ Create a basic sample project
  Create an advanced sample project
  Create an advanced sample project that uses TypeScript
  Create an empty hardhat.config.js
  Quit
Select the ▸ Create a basic sample project option.
Make sure to select yes for this option:
? Do you want to install this sample project's dependencies with npm (@nomiclabs/hardhat-waffle ethereum-waffle chai @nomiclabs/hardhat-ethers ethers)? (Y/n) ‣ y
We will be using Waffle and Ethers.js later on.
Run the below just in case they weren't automatically added:
npm install --save-dev @nomiclabs/hardhat-waffle ethereum-waffle chai @nomiclabs/hardhat-ethers ethers
After the following, we can check if Hardhat is working smoothly with:
npx hardhat compile
npx hardhat test
You should see:
Deploying a Greeter with greeting: Hello, world!
Changing greeting from 'Hello, world!' to 'Hola, mundo!'
    ✔ Should return the new greeting once it's changed (1612ms)

  1 passing (2s)
Moving forward, let's delete sample-test.js under test, sample-script.js under scripts, and lastly Greeter.sol under contracts.
Make sure not to delete folders, we will be working with them still.
Writing a contract
First create the file WavePortal.sol under the contracts folder.
Then input the code below:
// SPDX-License-Identifier: UNLICENSED

pragma solidity ^0.8.0;

import "hardhat/console.sol";

contract WavePortal {
    uint256 totalWaves;

    constructor() {
        console.log("Yo yo, I am a contract and I am smart");
    }

    function wave() public {
        totalWaves += 1;
        console.log("%s has waved!", msg.sender);
    }

    function getTotalWaves() public view returns (uint256) {
        console.log("We have %d total waves!", totalWaves);
        return totalWaves;
    }
}
Deploying your Contract
To deploy your contract to Gnosis, let's update your config file at hardhat.config.js.
For a complete configuration check hardhat config guide.
require("@nomiclabs/hardhat-waffle");
require('dotenv').config();

// This is a sample Hardhat task. To learn how to create your own go to
// https://hardhat.org/guides/create-task.html
task("accounts", "Prints the list of accounts", async (taskArgs, hre) => {
  const accounts = await hre.ethers.getSigners();

  for (const account of accounts) {
    console.log(account.address);
  }
});

// You need to export an object to set up your config
// Go to https://hardhat.org/config/ to learn more

/**
 * @type import('hardhat/config').HardhatUserConfig
 */
module.exports = {
  solidity: "0.8.4",
  defaultNetwork : 'gnosis',
  networks: {

    gnosis: {
      url: 'https://rpc.gnosischain.com/',
      gasPrice: 1000000000,
      accounts: [process.env.PRIVATE_KEY],

    },
  },
};
Proper private key management is critical. To safeguard your private key, it has been added to a .env file, or environment variable file. DO NOT PUSH THIS TO GITHUB OR COMMIT TO SOURCE CONTROL. Even if you delete it after, assume it will live on forever after being committed and is compromised. Add .env to your .gitignore if you plan on committing, or store securely it in an environment variable.
Let's install dotenv, to safekeep your private key:
npm install --save dotenv
Make sure to refresh your console/terminal afterwards, to make sure you have dotenv in your current environment.
Create a .env file in your root directory
In this file, add your private key like:
PRIVATE_KEY=<Your Private Key>
Next, create your deploy.js file under the scripts folder:
const main = async () => {
    const [deployer] = await hre.ethers.getSigners();
    const accountBalance = await deployer.getBalance();

    console.log("Deploying contracts with account: ", deployer.address);
    console.log("Account balance: ", accountBalance.toString());

    const waveContractFactory = await hre.ethers.getContractFactory("WavePortal");
    const waveContract = await waveContractFactory.deploy();
    await waveContract.deployed();

    console.log("WavePortal address: ", waveContract.address);
  };

  const runMain = async () => {
    try {
      await main();
      process.exit(0);
    } catch (error) {
      console.log(error);
      process.exit(1);
    }
  };

  runMain();
Now before you deploy, make sure you have funds in your wallet! Visit the funds page, if you don't have funds.
Deploy to Gnosis with the following command:
npx hardhat run scripts/deploy.js --network gnosis
Your output should look like:
Deploying contracts with account:  0x0F87E9E1A9981aCFe300A3f0f862ED1916326202
Account balance:  9992684695712000000
WavePortal address:  0x343610D353a0B2Ba86dDAAa348BF62B732107284
The WavePortal address variable, is your contract address.
You can verify the deployment on https://gnosisscan.io/, by putting your contract address in.
Adding your Front End
To get your front end up and running quickly, visit this Replit link and fork it by clicking the Use Template Button on the right side of the page.
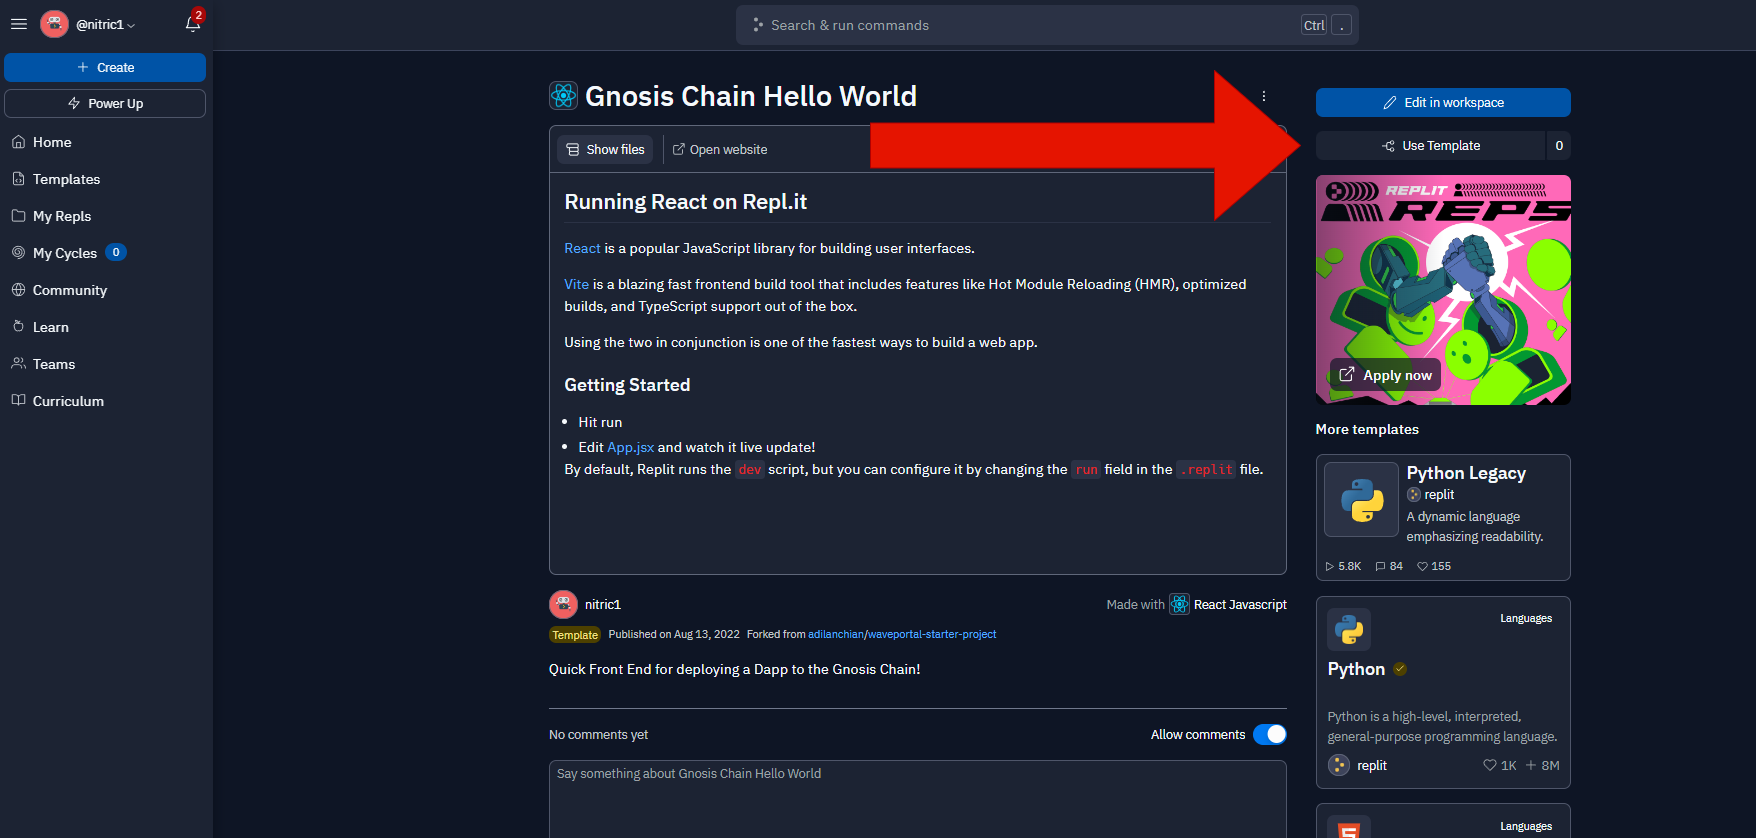
Navigate to the App.jsx file in Replit and follow the directions below:
To connect your contract with your front end, replace the contract address variable shown below with the contract address you received after deploying.
const App = () => {
  const [currentAccount, setCurrentAccount] = useState("");

  const contractAddress = "<Your Contract Address>"; //Replace this with your contract address (the WavePortal address)
  // Make sure to have your address surrounded by quotation marks
  const contractABI = abi.abi;
Lastly, in the Replit utils folder, we need to replace the WavePortals.json file with the generated json from when you deployed your contract.
In the repository you worked on your smart contracts, navigate to artifacts/contracts/WavePortal.sol/WavePortal.json, and copy that whole file into the replit file talked about above.
The file should look something like this:
{
  "_format": "hh-sol-artifact-1",
  "contractName": "WavePortal",
  "sourceName": "contracts/WavePortal.sol",
  "abi": [
    {
      "inputs": [],
      "stateMutability": "nonpayable",
      "type": "constructor"
    },
    {
Interacting with Contract
Congrats! You have created a full-stack DApp on Gnosis.
Make sure to wave at Gnosis.